win7os引导信息
(win7启动引导)
? 前言
显卡和十二代Intel平台降价,加上Windows目前,11也越来越稳定。我相信今年的618会有很多朋友选择更换电脑,而系统安装是安装的基本过程。
本文将与您分享2022年的三款Windows11系统安装工具的选择和使用教程Ventoy几乎乎支持所有操作系统的安装。末还放了一套性价比高的618装机推荐硬件。如果有帮助,欢迎点赞收藏评论三联哈。
 ? 系统安装过程的基本知识
以下流程通常是计算机新安装系统或重新安装系统。下面也按照这个逻辑和大家分享教程:
备份数据→制作装机工具→引导安装→系统分区→安装系统
本文分享了三个工具:
微软官方工具(Media Creation Tool)
聚合引导工具(Ventoy)
预制系统(PE)
其中的Ventoy另外两个工具可以整合在一起,同时支持Linux目前推荐的系统安装工具。
 ?
?? 装机工具的基本知识比较
本段主要讲解以下四种方案的区别,具体操作方案如下单独讲解。1??官方工具丨Media Creation Tool
适用环境:
最推荐的新手工具,用于新安装的纯系统(无论是否新电脑),哈希值验证,防止下载内容损坏,安装后不会有无法解释的第三方家庭桶,支持官方激活。
工具简介:1.Media Creation Tool作为微软官方提供的工具,功能包括OS本地升级 安装盘制作两个功能。2.OS本地升级是指计算机升级系统或重新安装操作,无需制作安装3.安装盘的生产功能是将安装文件写在U盘或其他存储介质上BIOS配置可以从U盘引导进入官方安装过程,即使不能进入原系统,也可以内置非常有用的分区工具。4.当系统损坏时,制作用于系统损坏时的修复。5.生产后的U盘将包括指导分区和存储分区,因此U盘仍可用于复制和存储其他文件。下面提到的工具都是这样的,不用担心浪费高性能U盘的空间。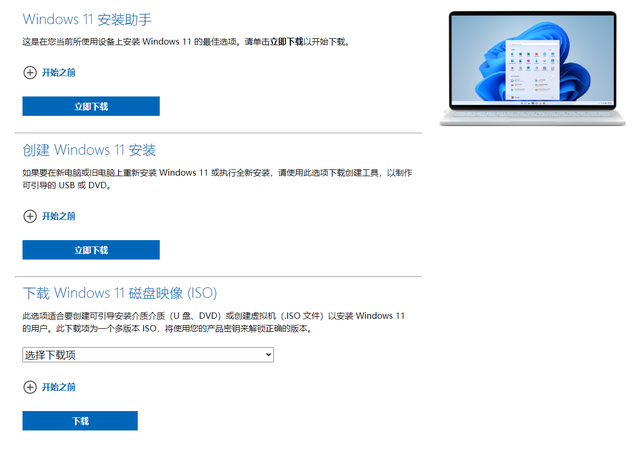
额外提醒:
Win微软从7开始提供类似的工具(Windows 7 USB/DVD Download Tool),支持Legacy和UEFI引导,Win10和Windows11的Media Creation Tool实测Legacy引导可能会失败,建议更换这种主板,太老了。
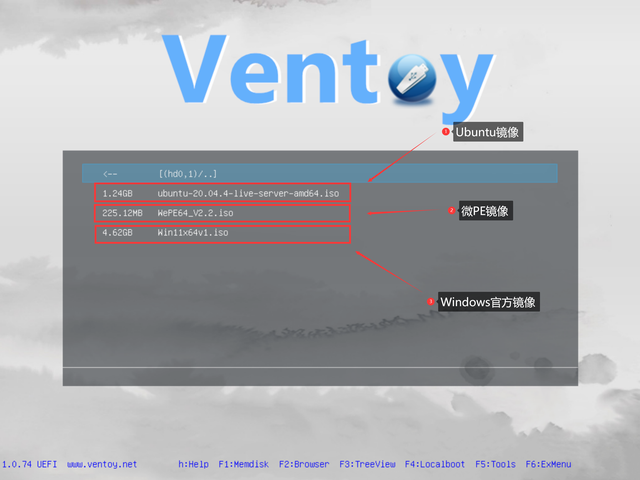
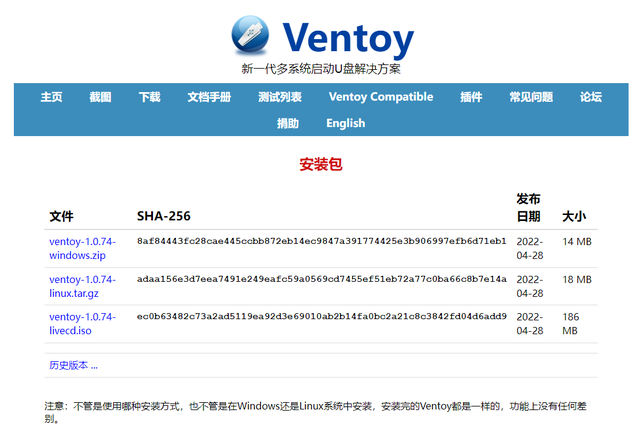
2??聚合引导丨Ventoy(推荐)
适用环境:
单说安装系统的目的,Ventoy和使用率很高的PE最终目标是介质(U支持多个版本的系统安装,不仅支持Windows安装,Linux分支系统Ubuntu、爱情也可以通过它来储存和安装。
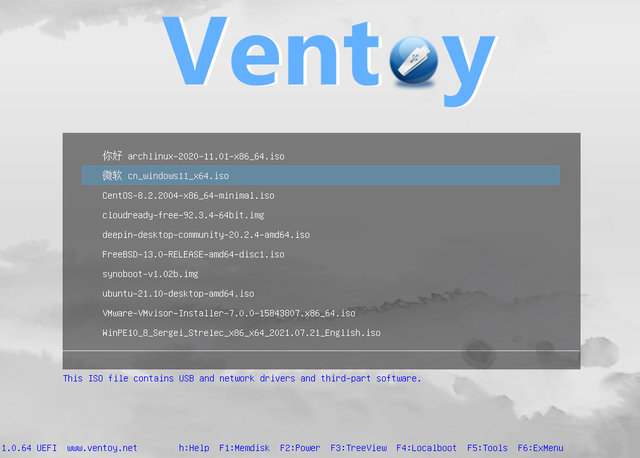
原理简介:
Ventoy不是传统意义上的多功能图形操作系统,而是针对不同核心系统的轻量化聚合引导工具,包括PE可以放进去,用习惯会比较PE方便多了。个人建议尝试后更换。PE盘。
3??预制系统丨PE(Preinstallation Environment)
适用环境:
字面意思,PE它是一个独立的操作系统,几乎所有形式的系统安装包都可以通过内置工具安装,比如Lopatkin和荒大定制精简版(wim、esd、img格式),也支持Ghost恢复,但需要使用的安装文件需要自己找到。
原理简介:PE一般是以Windows基础(内核),Ubuntu也有类似的Upstate版本不仅可以作为安装,还可以作为安全测试环境或修复原始系统或管理文件,作为多功能工具。
额外提醒:
再次提醒,如果你想通过PE安装系统,下载系统文件时记得选择可靠的平台。此外,一些野鸡PE安装时提供的安装工具可能会携带私货(安装第三方软件),不建议新手使用。额外提醒:
 再次提醒,如果想通过PE安装系统,下载系统文件时记得选择可靠的平台。此外,一些野鸡PE安装时提供的安装工具可能会携带私货(安装第三方软件),不建议新手使用。
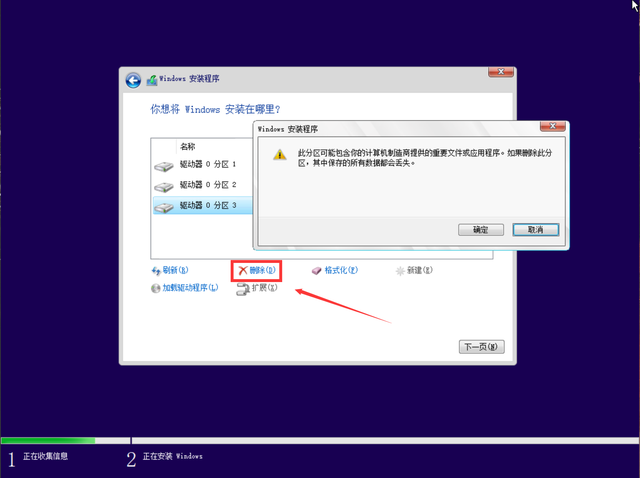
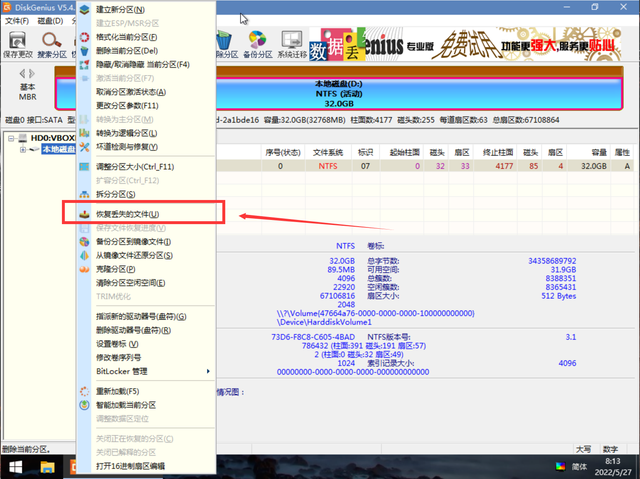
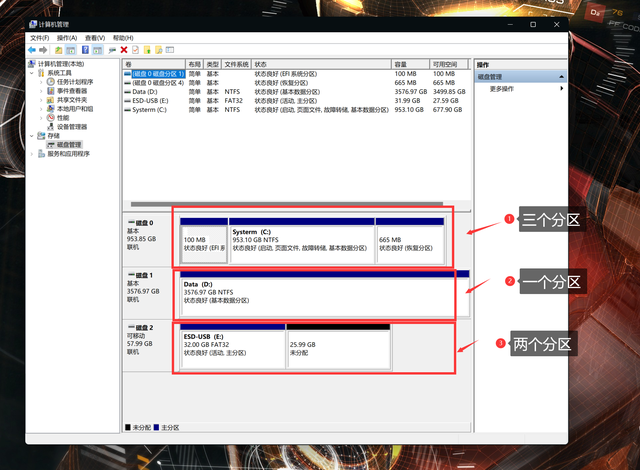
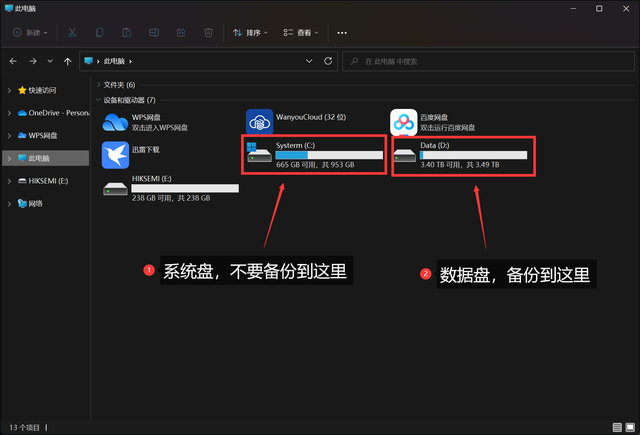
 ? 前置操作归还U盘空间新手朋友会遇到制作安装板但无法进入安装界面的问题。一般来说,U盘包含其他分区(见下图)导致的指导失败。在这里,我将教你如何返回U盘空间。
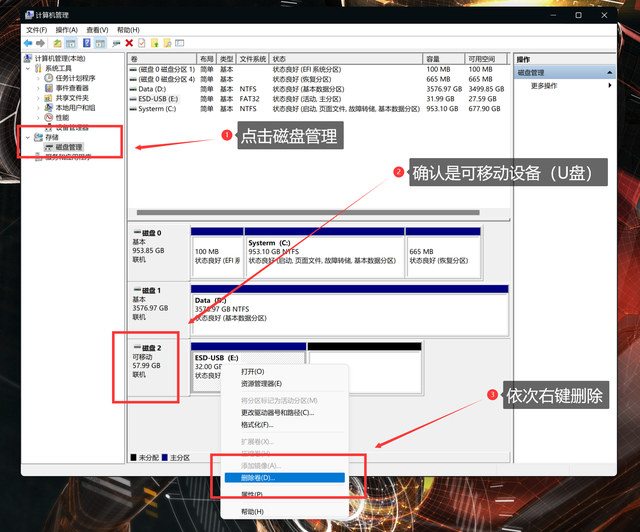 以我之前安装的U盘为例,将U盘连接到电脑上,右键此电脑进入管理。
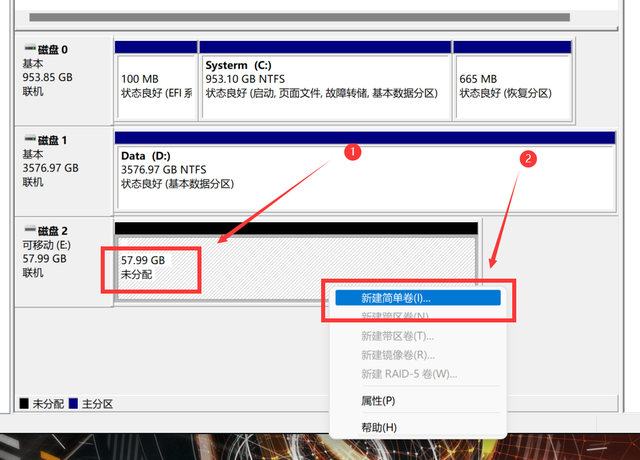 单击存储下面的磁盘管理工具,找到您的U盘,确认U盘上的文件,右键删除U盘上的所有现有卷。
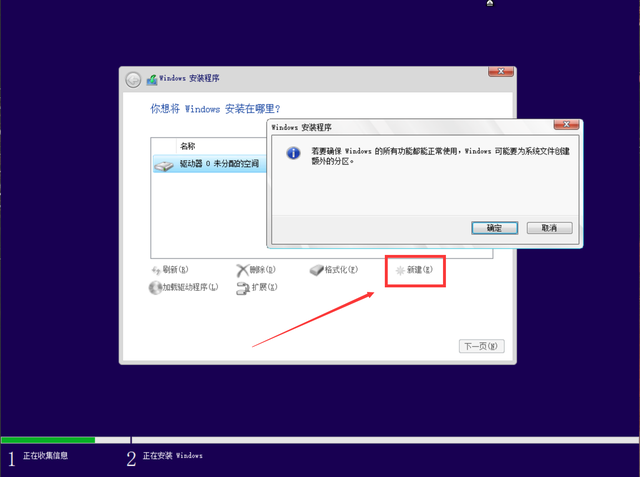
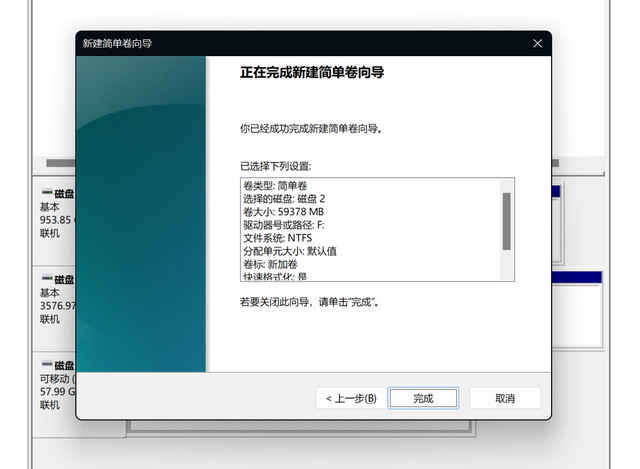 删除后应如下图所示,只有一个黑色区域,标记为未分配,右键选择新的简单卷。
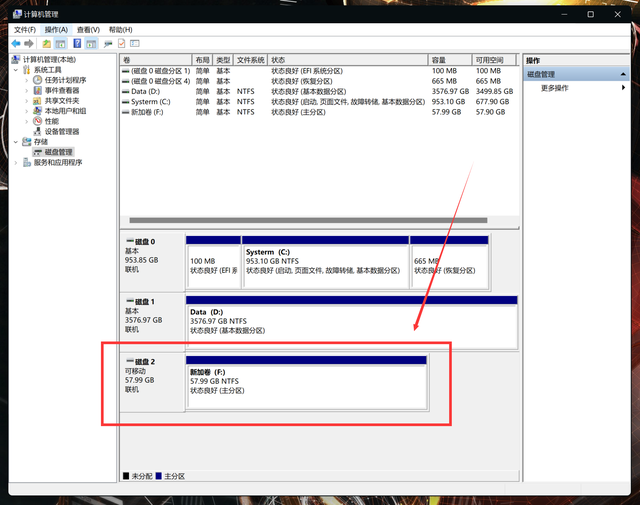 然后一路下一步,不懂就不要改设置。
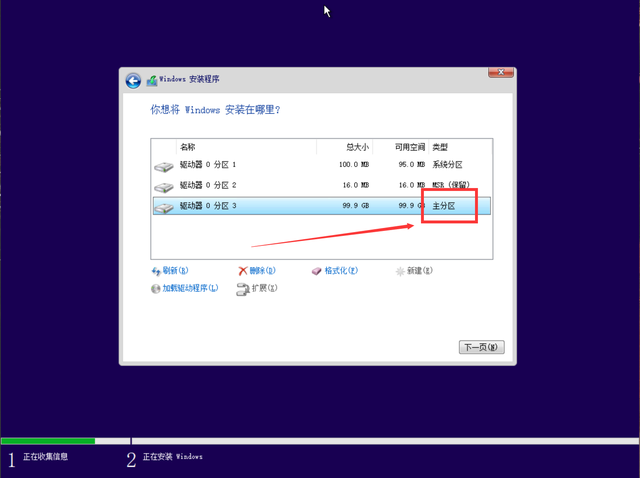
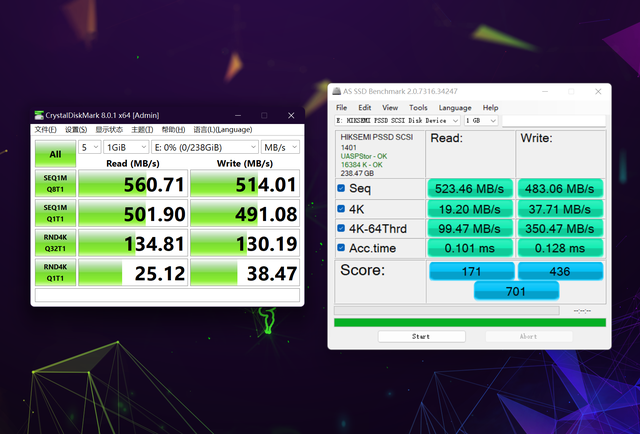 如下图所示,确认如下图所示,U盘子只包含一卷。
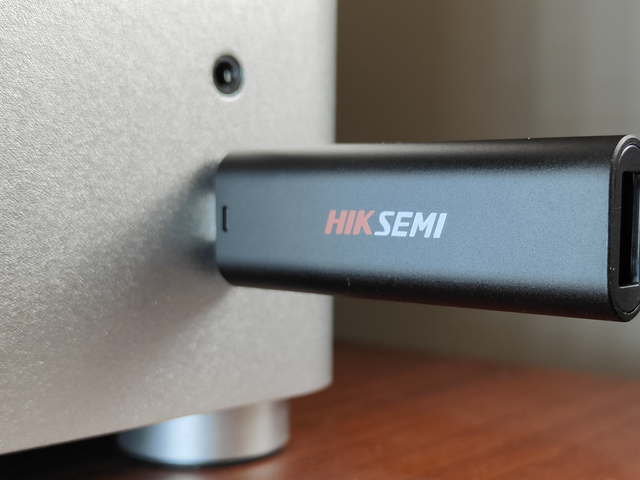
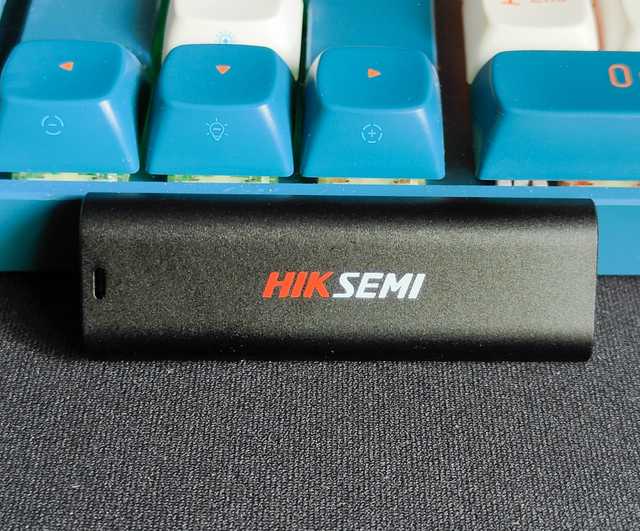
更重要的是,安装系统的速度实际上与U盘的性能有关。这主要取决于顺序读写能力和延迟。如果你感兴趣,你可以自己拿AS SSD或者CrystalDiskMark在测试下,读写至少应大于100MB/s,延迟需要低于10ms,我做Ventoy储存这块海康X306C数据如下,挺香的。
? 前置操作,镜像下载验证
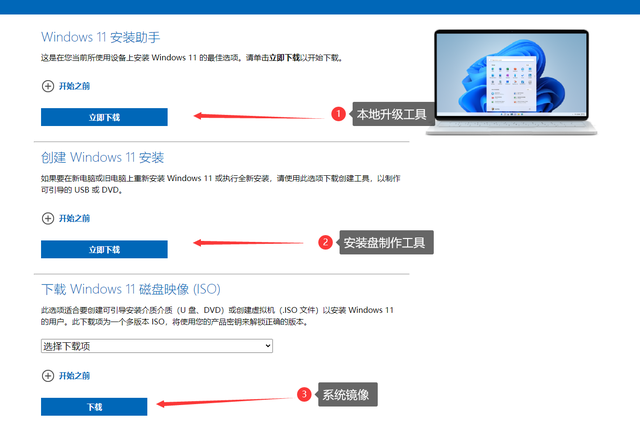
除了U盘分区问题,镜像损坏也是安装失败的原因。以下微软官方工具(MediaCreationTool)自带下载验证流程,无需手动验证。
https://www.microsoft.com/zh-cn/software-download/windows11
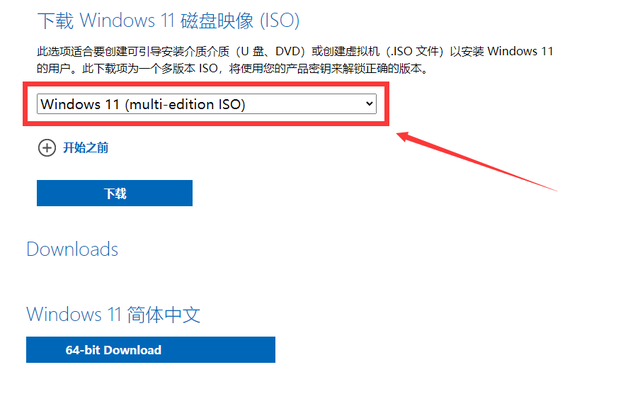
如果选择Ventoy或者PE安装系统需要手动下载镜像。建议选择聚合版(multi-edition),同时尽量用浏览器下载,不要用闪电:
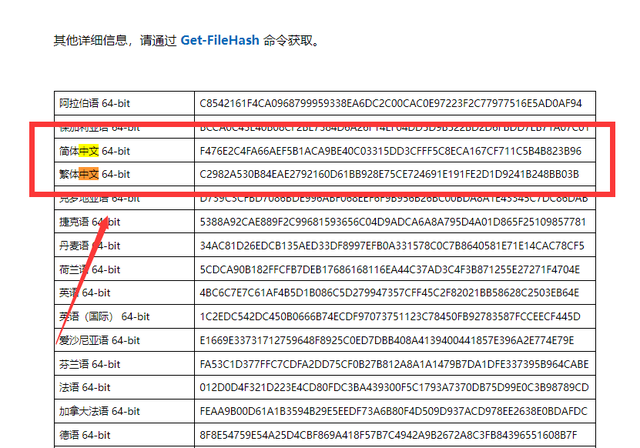
如果没有,微软在下载链接下给出了相应的镜像值,请更换下载工具:
聚合版本 简体中文 64位 镜像F476E2C4FA66AEF5B1ACA9BE40C03315DD3CFFF5C8ECA167CF711C5B4B823B96聚合版本 繁体中文 64位 镜像C2982A530B84EAE2792160D61BB928E75CE724691E191FE2D1D9241B248BB03B
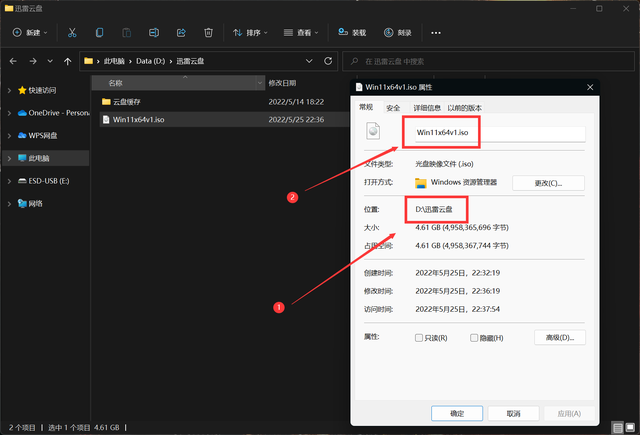
验证方法也比较简单,首先确认文件路径,下载右键镜像选择属性,1 2是文件的路径,比如我在这里:
D:\\迅雷云盘\\Win11x64v1.iso
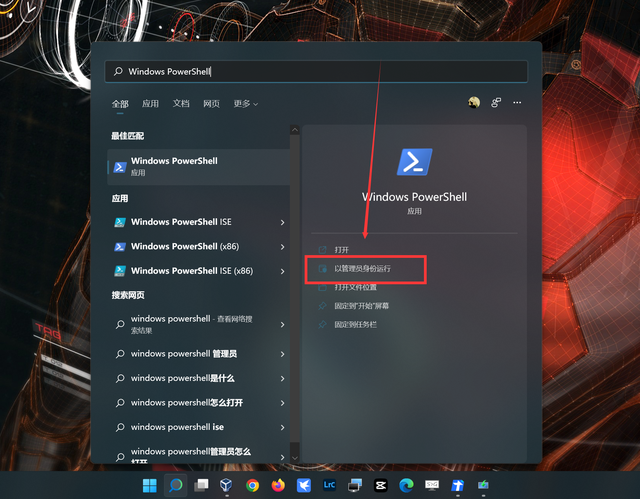
windows搜索搜索栏Windows PowerShell,点击管理员身份运行。
哈希值输入以下代码计算文件:
Get-FileHash 镜像路径
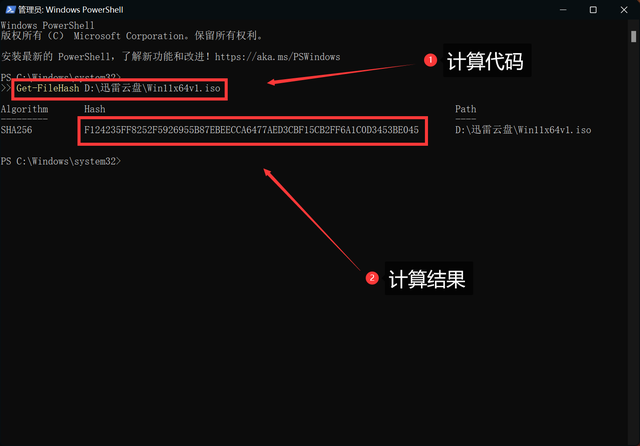
比如我这里就是:
Get-FileHash D:\\迅雷云盘\\Win11x64v1.iso回车开始实施计算,计算后可与官方值进行比较,与作者给出的值相比,个人制作的精简镜像也可以知道文件是否损坏。
? ? 制作工具,微软官方安装盘
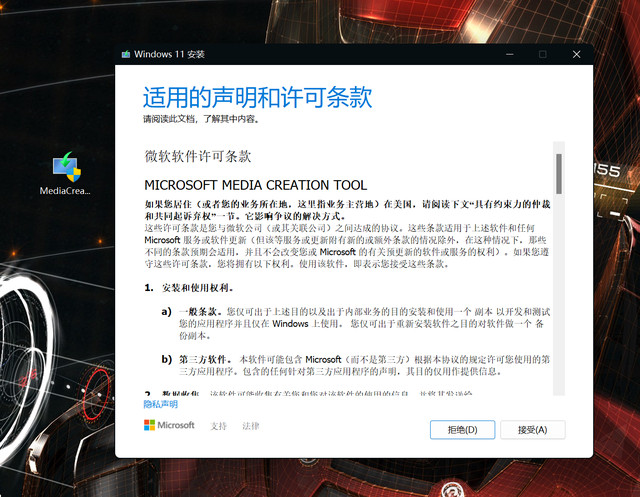
这类教程太多了,简单过一遍。
1??
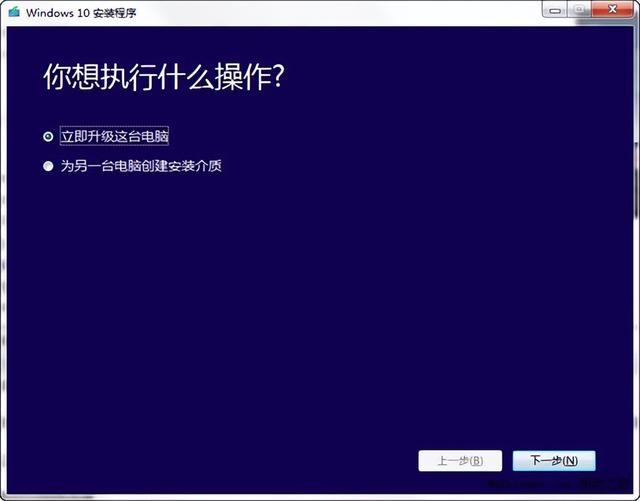
制作流程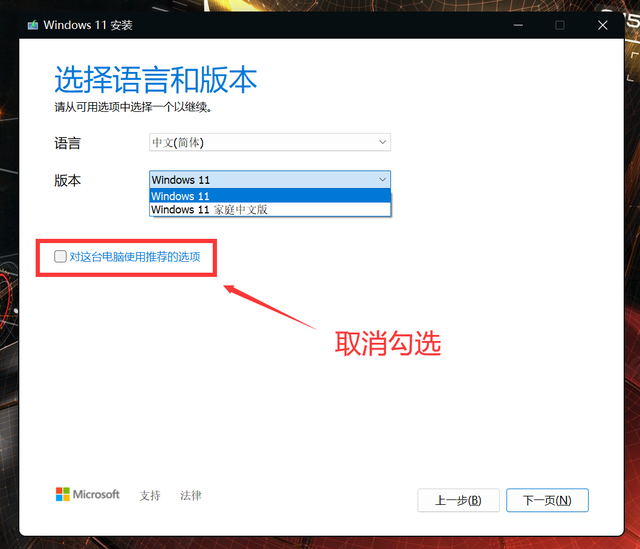 首先,您需要下载官方工具(上一段)。下载后,将U盘插入计算机。生产将删除U盘上的所有内容。如果U盘上有重要信息,请记住在计算机上备份非C盘分区。系统安装正常,不涉及非C盘上的内容。
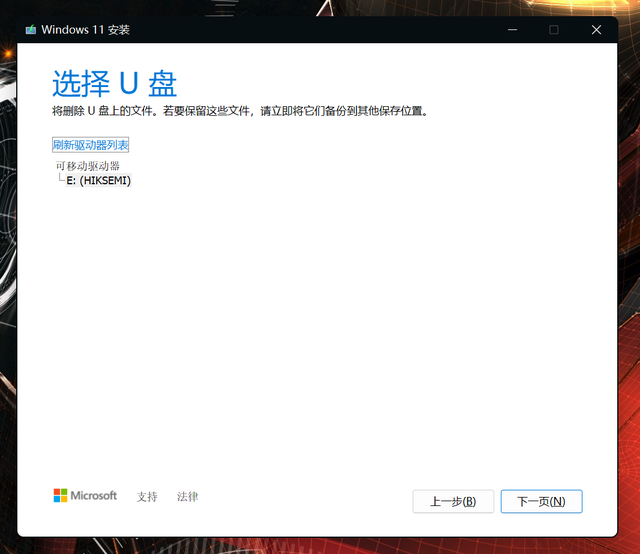 双击打开MediaCreationTool,点击接受并创建安装盘。
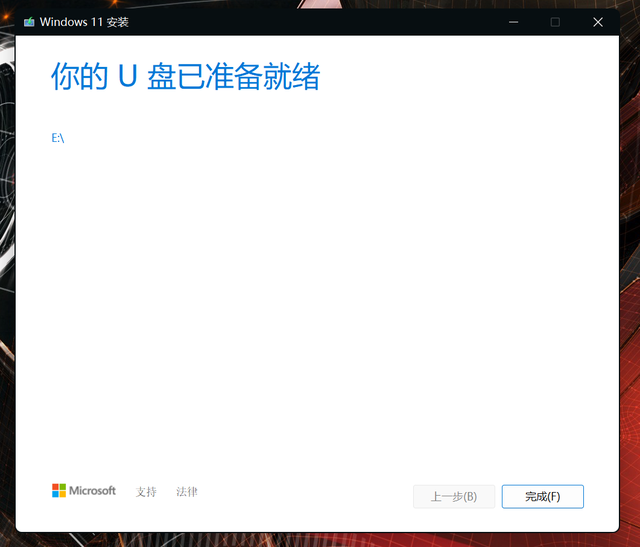 下一步要注意,MediaCreationTool默认情况下,镜像是根据当前系统下载的。取消推荐检查是制作包含多版本镜像的安装板。
如果您在这里看不到看不到可选项,请查看上一段前置操作,包括多个分区或未创建分区。
下一步就好了,持续时间会比较长,根据网络质量在10-30分钟之间,主要是MD5验证时间长,提示完成后可拔下U盘开始安装系统。
特别提醒:如果在确认计算机接口没有问题的前提下写入错误,建议更换U盘,主要是U盘坏块或插座有问题。
 2??镜像放置
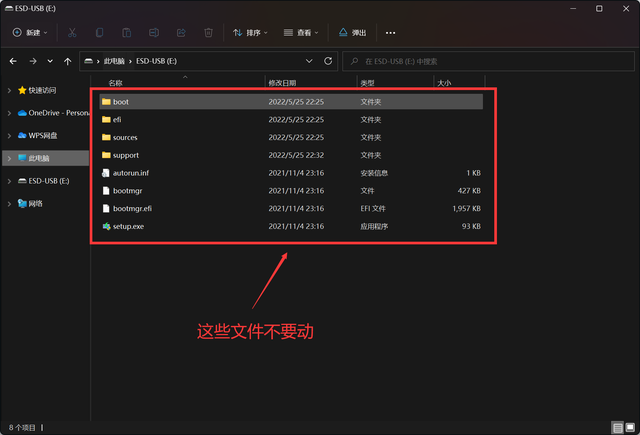
官方工具包含系统镜像并放置在U盘存储分区的根目录下(如下图所示)。不要移动它们。不要单独存储/重命名/删除/移动新文件夹。
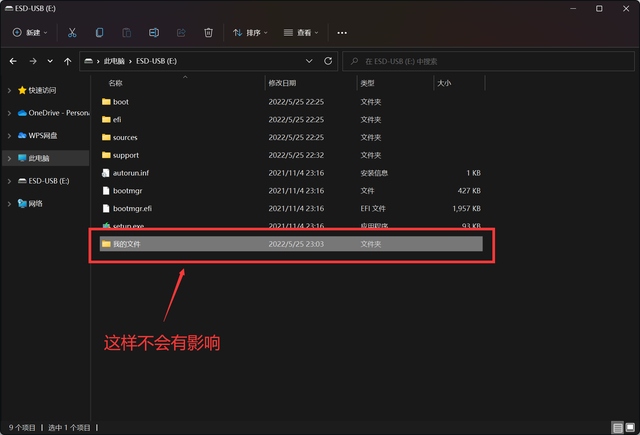
如果您想继续存储一些其他文件,您可以建立一个新的文件夹,以免影响安装板。接下来,请跳转安装过程选择指导。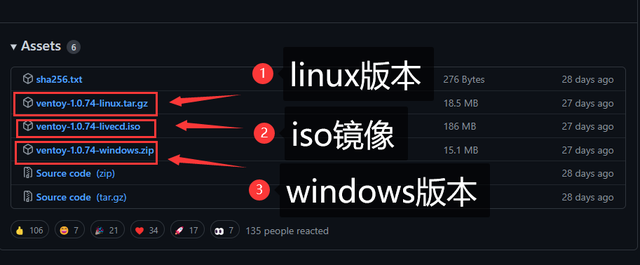 ? 工具制作丨Ventoy引导盘Ventoy虽然是新软件,但实际操作并不难,没有心理压力。1??
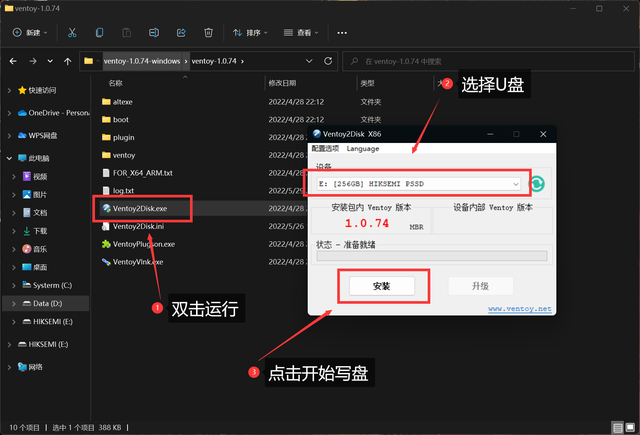 制作流程
制作流程首先需要下载制作工具,一共三个版本,别下错了,官方地址:
https://github.com/ventoy/Ventoy/releases
下载后解压,将U盘插入电脑,双击运行Ventoy2Disk.exe,点击安装后选择U盘制作。
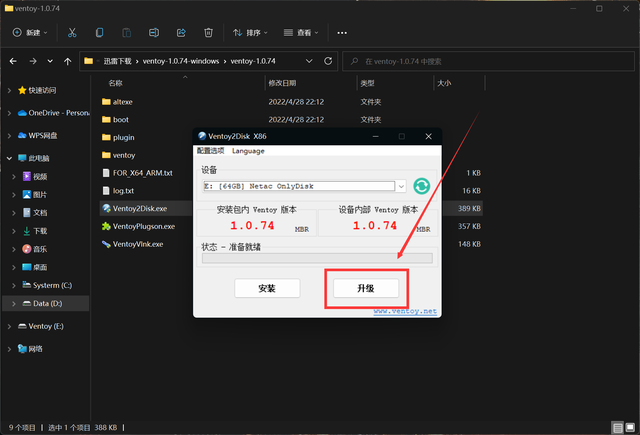
 后期如果Ventoy有更新,点击下载最新工具升级。后期如果Ventoy有更新,点击下载最新工具升级。
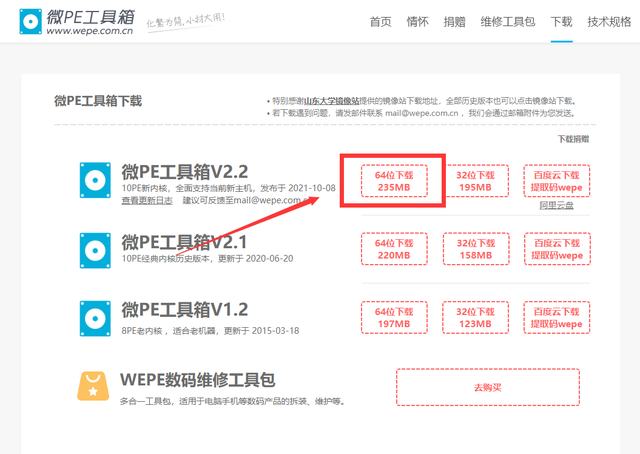 2??
2??镜像放置
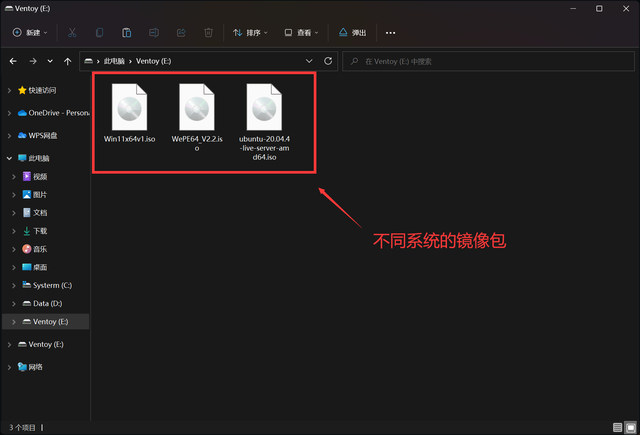
Ventoy这只是一个指导工具,所以在生产完成后,请将下载的系统镜像文件复制到U盘上。您可以根据目录或新文件夹进行管理,而无需单独区分系统。接下来,请跳转安装过程选择指导。
 ? 工具制作丨PE系统盘前面提到的,Ventoy可以引导PE做娃娃,这里分为物理U盘和镜像包两部分讲解。首先常下载制作工具,推荐广受好评的微PE:
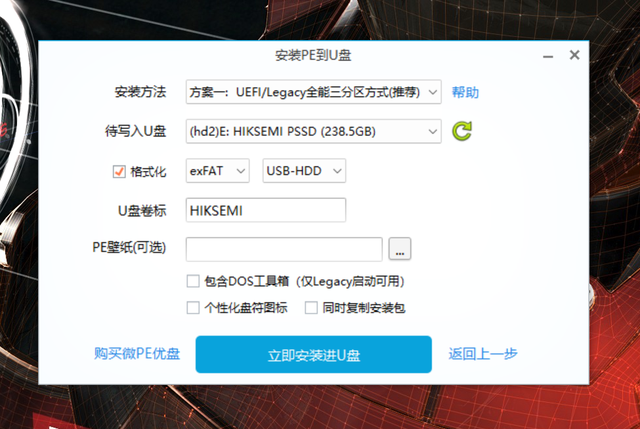 https://www.wepe.com.cn/download.html
1??
 生产工艺(物理U盘)
将U盘插入电脑,双击打开WEPE选择安装工具PE到U盘。
默认配置即可,点击立即安装到U盘,等待完成即可完成别之处。
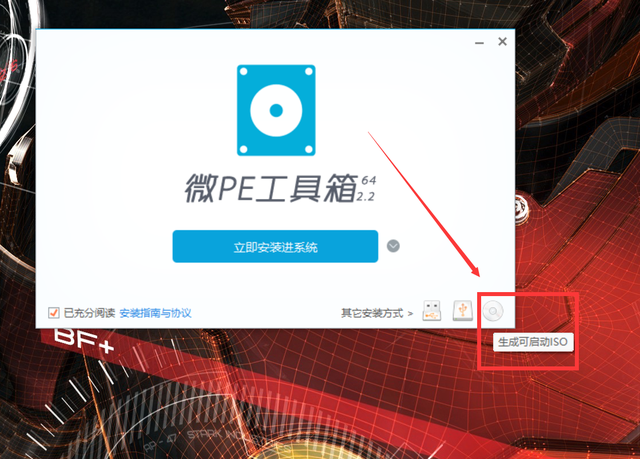
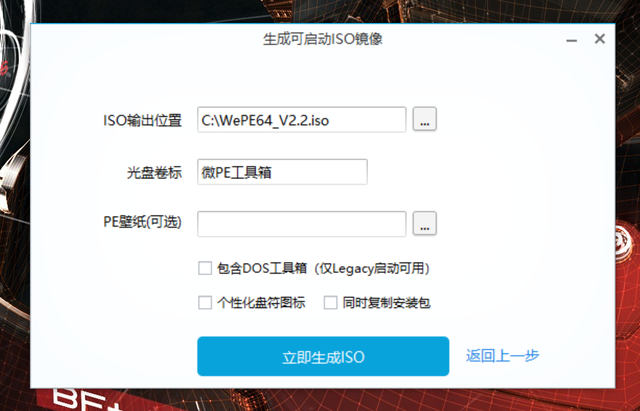
2??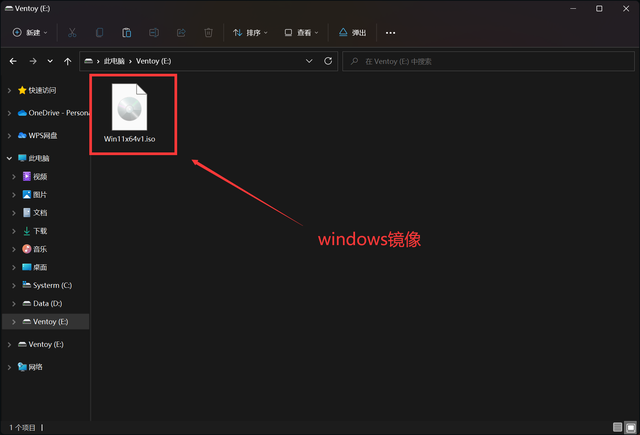 制作流程(ISO镜像)如果想配合Ventoy可以选择生成可启动的套娃ISO。点击立即生成ISO可以,配置不需要改变,默认生成在C盘的根目录上,复制写Ventoy可在U盘上使用。
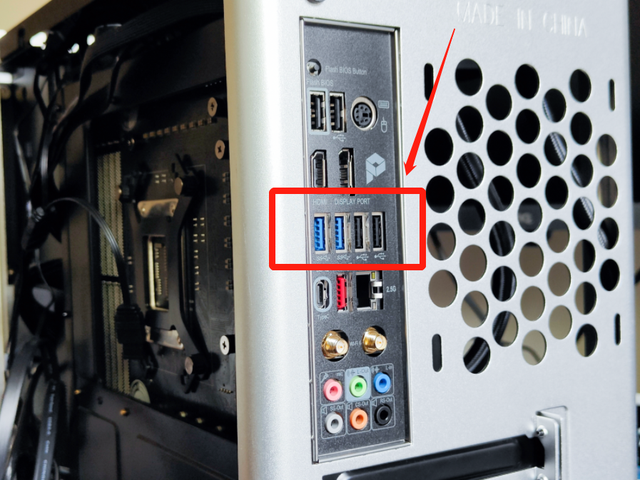
3??镜像放置
和Ventoy同样,制作完成后,请将下载的系统镜像文件复制到U盘上,管理根目录或新文件夹。接下来,请跳转安装过程选择指导。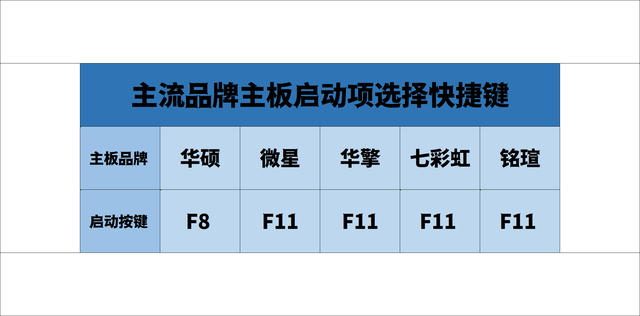 ? 选择指导安装过程
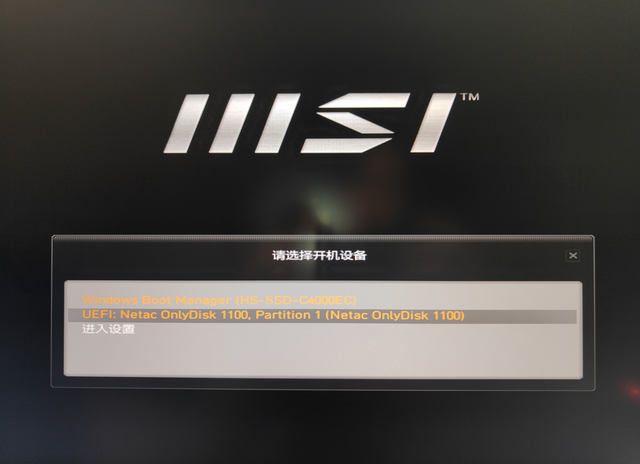
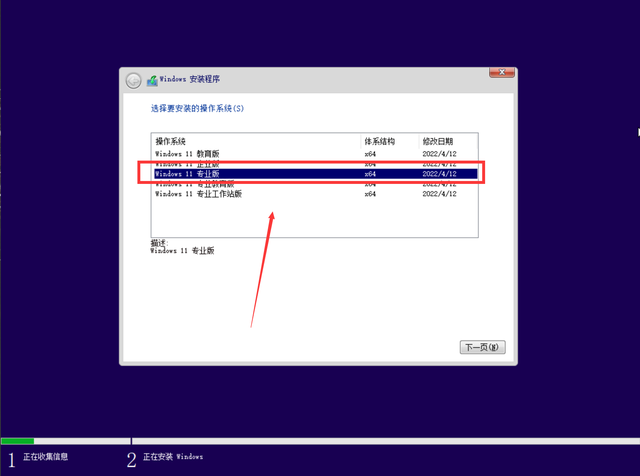
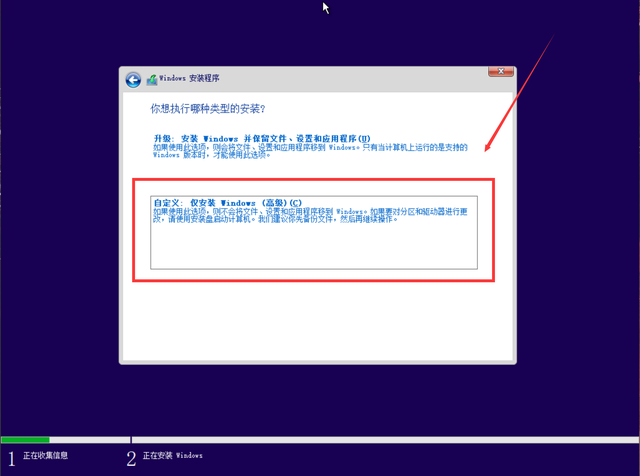
制作完成后,安装系统的第一个过程是指导。这三种方法相似,细节也会有所不同。
重要提示:制作安装盘后,将U盘插入电脑。建议使用主板接口和一些低端机箱USB接口供电/传输不稳定,最终导致安装失败。
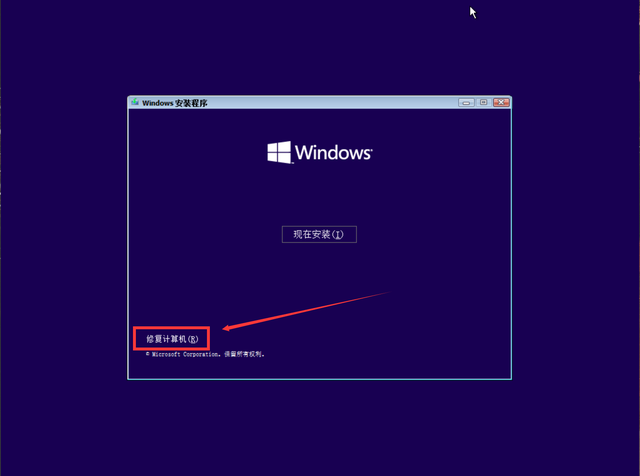
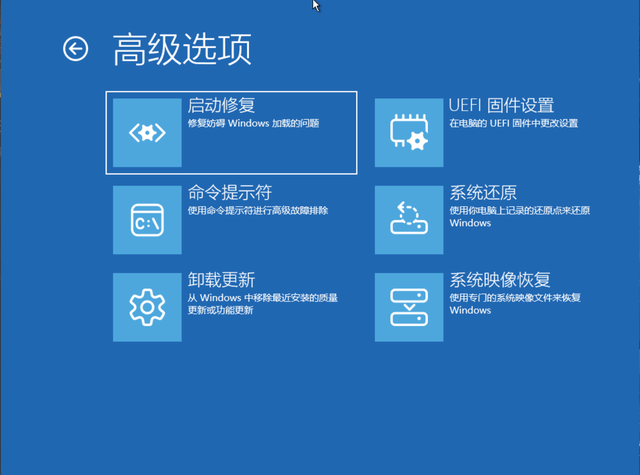
1??微软官方工具一般教程会让你进入BIOS其实主板都是配置启动项的。 有单